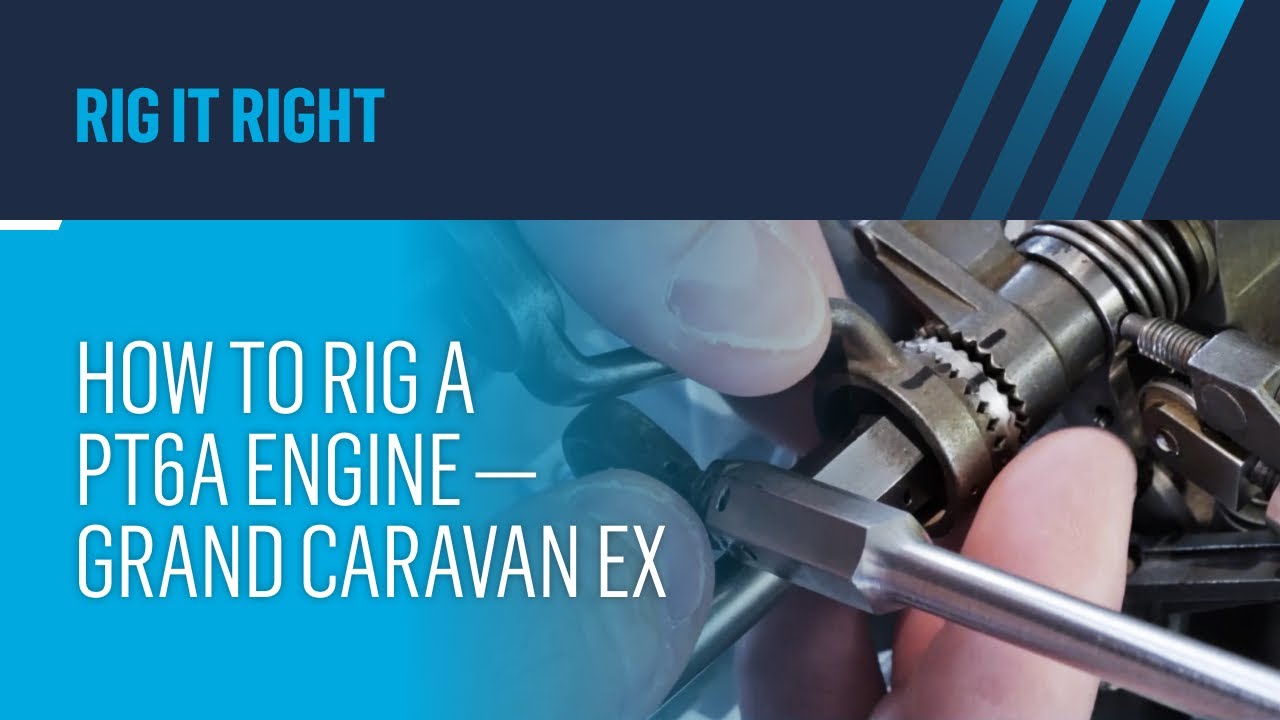
Follow along as our experts take you through each and every step when it comes to adjusting engine control systems and final rigging, for the smoothest flight possible when taking to the skies. ⬇️⬇️⬇️⬇️
Be sure to check out the rest of our Rigging Your PT6A Engine series here: [ Ссылка ]
Jump to:
00:15 - Introduction
00:42 - Engine Controls
01:06 - Propeller Control System
01:34 - Rigging the Power Lever
01:47 - Propeller
02:12 - Beta Lever Rigging
02:52 - Beta Valve Adjustment
03:18 - Reset Link
03:43 - Rear section connections
04:00 - Cambox Connections Explained
04:27 - Cambox Input Lever
04:43 - Cambox Track Point
05:02 - Cambox Power Lever Input
05:24 - Cambox Upper Interconnect Rod
05:36 - Cambox FCU Input Lever and Interconnect Rod
06:10 - Making the FCU Connection
07:16 - Power Lever Motion Check
07:40 - Forward and Reverse Dead Band Check
08:26 - Adjusting the Dead Band Width and Size
09:44 - Cambox Beta Cable Rear Clevis
10:03 - Condition Lever Rigging
10:46 - Emergency Power Lever
11:11 - Run Bay Adjustments
12:06 - Max Reverse Torque Check
12:46 - Max Reverse Torque Adjustment
14:36 - Engine Adjustments (Low and High Idle NG Check)
15:09 - Engine Adjustments (Low and High Idle NG Adjustment)
16:00 - Engine Adjustments (Max Propeller Speed and Torque Check)
16:42 - Engine Adjustments (Max Propeller Speed and Torque Adjustment)
17:06 - Engine Adjustments (Torque Limiter Check)
17:57 - Engine Adjustments (Max Reverse Propeller Speed Check)
19:00 - Engine Adjustments (Max Reverse Propeller Speed Adjustment)
19:32 - Engine Adjustments (Minimum Governing Propeller Speed and Feathering Point)
Become a part of the PT6 Nation and follow us:
Website: [ Ссылка ]
Instagram: [ Ссылка ]
Facebook: [ Ссылка ]
Twitter: [ Ссылка ]
©2020. Pratt & Whitney Canada. All rights reserved.
#PT6Nation #PT6 #PT6A #AviationTechnicians


![Настройка сетевых служб Windows Server 2019 [Основы системного администрирования]](https://i.ytimg.com/vi/vuGcHS6QnMY/mqdefault.jpg)


![Старейшая нерешённая задача [Veritasium]](https://i.ytimg.com/vi/FuRem6-sTmQ/mqdefault.jpg)