In this video, I show you how to create a Filtered Data Extension in Marketing Cloud.
It's important to know how to create Filtered Data Extensions in Marketing cloud because you'll be using data extensions A LOT when you're working in Marketing cloud.
Data Extensions will hold a high percentage of your customer information in Marketing Cloud if not ALL of your customer information in Marketing Cloud.
It's important to know how to create filtered Data Extensions if you ever want to sort and organize data from other Data Extensions.
Filtered Data Extensions take filter criteria in order to grab customers from a current Data Extension and put the filtered subscribers from the previous Data Extension into the new Data Extension.
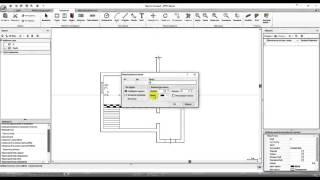
When you create a Data Extension, you need to go to either Email Studio or Contact Builder and choose "Data Extensions" and then click "Create".
Then you need to choose if you want to create the Data Extension from scratch, or if you want to create it from an existing Data Extension or a Data Extension template.
Then you need to choose the Type of data extension you want to create, like a "Standard, Filtered, Random" Data Extension. In this case, we'll create a "Filtered" Data Extension.
Then you need to choose a name for the Data Extension, and then fill out all of the remaining details for the Data Extension properties.
After you choose the Marketing Cloud Data Extension properties, you want to choose the columns that will be in the Data Extension.
Choose the primary key (If you have one in the data extension), the data types for the columns that you create, and the Send Relationship (Mapping the Data Extension Primary Key to Subscriber Key).
Then click "Create" and your Data Extension is complete.
Here's the link to documentation on Creating Data Extensions:
[ Ссылка ]
If you have any other questions, leave a comment below or email me at minuteadm@gmail.com!
Like this video and SUBSCRIBE to this channel, MinuteAdmin as well!


![Alan Parsons - From The New World [2022]](https://i.ytimg.com/vi/V5IssBeTijo/mqdefault.jpg)


![Я здесь крыша! Я здесь все решаю! | MEOW - 19 серия [4K]](https://i.ytimg.com/vi/teM8FgTwjd4/mqdefault.jpg)