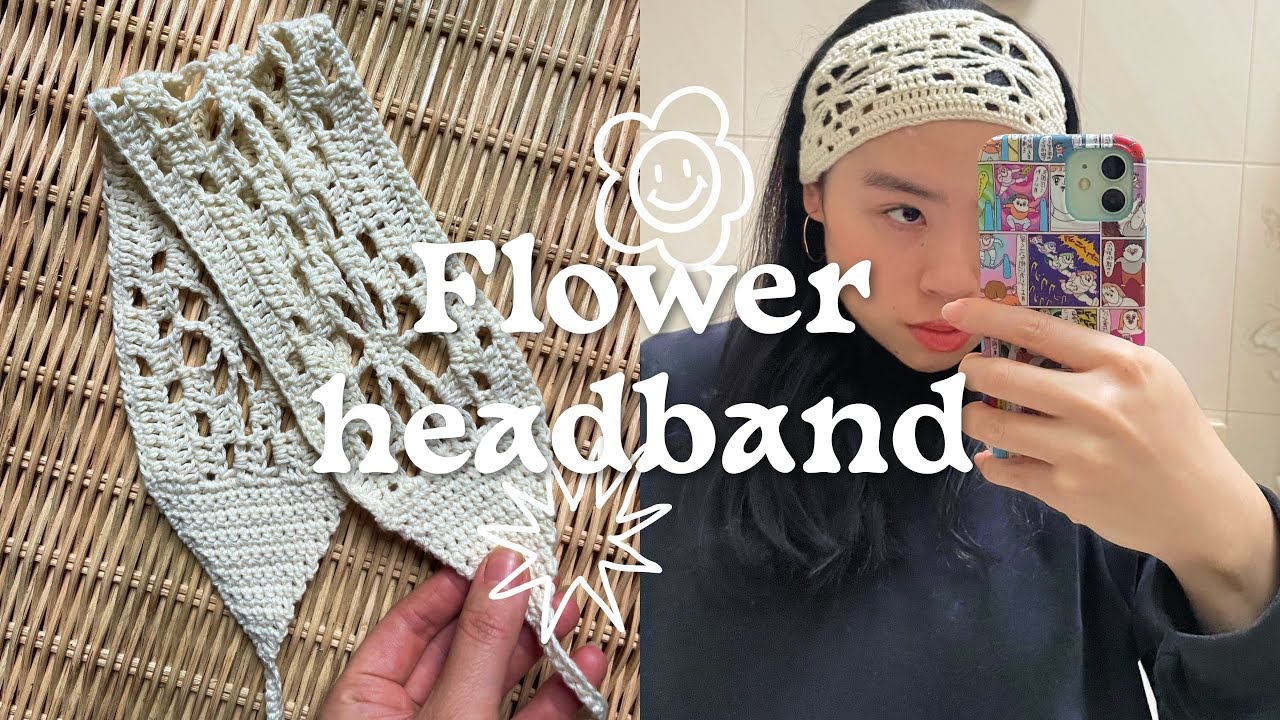
Written pattern below, plus a few additional resources, to set you up to crocheting your very own flower/vintage-y spider filet & blocks headband! 😊 This video should serve as supplementary to round out what's written. If you're brand new to this flower pattern, check out Nikita Nightingale's tutorial's under 'resources'.
❦ Follow along for never ending cosy content
Subscribe ✷ youtube.com/c/dearrainietv/?sub_confirmation=1
TikTok ✷ [ Ссылка ]
Instagram ✷ [ Ссылка ]
Shop & support ✷ [ Ссылка ]
*✷ Materials & tools*
• Hook: 3 mm WeCrochet aluminium hook (in a set of nine), [ Ссылка ] (*)
• Yarn: 4 ply cotton yarn, I had a 50 gram skein and would estimate that you’d use less than 25 grams for this project.
• Tools: Scissors, darning needle (to weave in tail ends), optionally stitch markers and measuring tape.
*✷ Notes on the pattern*
• Begin working the body of the headband, followed by the left tie, and then joining more yarn to finish at the right tie.
• An individual flower is made is up of 25 stitches; for three rows of flowers, the total stitch count will be 75 (either by working a row of 75 foundation single crochet stitches, or chaining 76 and following with a row of 75 single crochet stitches). I use the latter approach.
• Work is turned after each row with a chain one (1 ch).
• The size of my completed headband measures 320 mm / 12.59 “ W by 80 mm / 3.14 “ H for the body and 210 mm / 8.26 “ for each tie.
*✷ Abbreviations* (US terms)
ch = chain
st = stitch
sc = single crochet
dc = double crochet
tr = treble crochet
sl st = slip stitch
✦...✦ = pattern repeats
*✷ Instructions*
• Foundation row: 76 chain.
• Row 1: Work sc along chains to total 75 st.
• Row 2: ✦7 dc, 2 ch, 4 dc, 2 ch, 10 dc✦ to end of row. When ‘2 ch’, skip the same number of st in row; when working over ch spaces, work into spaces as opposed to into the stitches themselves (see video tutorial at 03:55).
• Row 3: ✦7 dc, 2 ch, 4 dc, 2 dc, 4 dc, 2 dc, 4 dc✦ to end of row.
• Row 4: ✦1 dc, 2 ch, 4 dc, 4 ch, 1 tr, 4 ch, 4 dc, 2 ch, 4 dc✦ to end of row. When working tr, work into centre ch space.
• Row 5: 1 dc, 2 ch, ✦4 dc, 5 ch, 3 sc, 5 ch, 4 dc✦, 3 ch repeat ✦...✦, 3 ch, repeat ✦...✦. For set of three sc, work the first in the ch space, the second in the st above the tr, and the third and final in the adjacent ch space.
• Row 6: ✦1 dc, 6 ch, 5 sc, 6 ch, 4 dc✦, repeat altogether 3 times.
• Row 7: 1 dc, 2 ch, ✦4 dc, 5 ch, 3 sc, 5 ch, 4 dc✦, 3 ch, repeat ✦...✦, 3 ch, repeat ✦...✦.
• Row 8: ✦1 dc, 2 ch, 4 dc, 4 ch, 1 tr, 4 ch, 4 dc, 2 ch, 4 dc✦, repeat ✦...✦ altogether 3 times.
• Row 9: ✦7 dc, 2 ch, 4 dc, 2 ch, 4 dc, 2 dc, 4 dc✦, repeat ✦...✦ altogether 3 times.
• Row 10: ✦7 dc, 2 ch, 4 dc, 2 ch, 10 dc✦ repeat ✦...✦ altogether 3 times.
• Row 11: Sc to end of row. Do not tie off (we’ll continue onto stitching up the left tie)!
*✷ Left tie*
• Row 1: 1 ch, work 18 sc along sides of dc, 2 sc for every dc, work around or in between each st. To taper ties, decrease once at each end of every row until you reach 2 st in a row (16 rows required in total).
• Row 16: 1 sc, 30 ch (you can alter the number of ch to as long or short as you need to comfortably tie around your own head); sc into back bumps of ch. Join tapered edge of tie with a sc into the second st of the row. Cut yarn and weave in tail ends.
*✷ Right tie*
• Join yarn into first sc on the right-edge of the headband body, 1 ch to turn and face the sides of previously worked dc.
• Row 1–16: As previously described, follow the same instructions and techniques to taper into ties. Once completed, tie off, weave in tail ends and you'll have made your own floral lace headband! 🥳
*✷ Resources*
→ Crochet flower top tutorial, [ Ссылка ] from @nikitanightingale
→ 🎶 Mark Generous - Peach Ice, [ Ссылка ]
→ 🎶 Hunt Club - Getaway, [ Ссылка ]
*✷ Chapters*
00:00 - Welcome
00:42 - Construction
01:06 - Materials & tools
01:32 - Getting started
02:48 - Starting double crochet
03:22 - Chain spaces
03:55 - Working into chain spaces
05:36 - Use of single crochet
06:46 - Working first tie
10:38 - Working second tie
Links followed by an asterisk (*) are affiliate links. I won’t endorse products I haven’t used and enjoyed. Your support is appreciated! 😌
✷ ✷ ✷
Welcome to #CrochetDiaries – a log for one designer’s experimentations and projects as a budding crochet nut! Watch me wrangle with yarn, hook, and camera to (hopefully) bring you informative, creative tutorials.


![Не быкуй, по-хорошему реши | MEOW - 16 серия [4K]](http://i.ytimg.com/vi/8IHe68F-SDs/mqdefault.jpg)


![Барыги ровными никогда не бывают | MEOW - 14 серия [4K]](http://i.ytimg.com/vi/DlqUzIT8Fsc/mqdefault.jpg)


![Ты мне доверяешь, родной? | MEOW - 13 серия [4K]](https://i.ytimg.com/vi/na7KnyXuqVs/mqdefault.jpg)


![СБОРНИК #8 [ Создание манги в мире ван пис ] \ Альтернативный сюжет ван пис](https://i.ytimg.com/vi/idznLKU4ZpM/mqdefault.jpg)