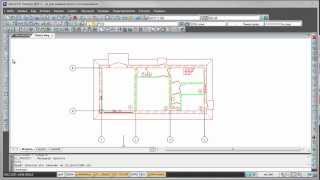
Using the vectorscope within Davinci Resolve 12.5 to check and set white balance. This video is very similar to one I made a while back for Premiere Pro CC. The theory is the same but this is how you do it in Resolve.
I use a sample frame which I shot far too warm (unintentionally actually) and then use the colour correction settings, the crop feature in the editor and the vectorscope to set a precise grey.
Of course, I would recommend you set this correctly in camera before you shoot and would always use some kind of grey card as a reference rather than kitchen tiles but this works and gives you a good starting point if you're stuck.
Really though, this is about knowing how to read and use the vectorscope, an essential tool in any colour grading.
Thanks for watching and please comment below if you have any questions or suggestions for future tutorials.
========================
► BUSINESS ENQUIRIES: info@tdcat.com
► FIND ME ONLINE:
Web: [ Ссылка ]
Instagram: [ Ссылка ]
Twitter: [ Ссылка ]
► MY GEAR & SOFTWARE:
Screen Capture: Camtasia 9
Main Mic: Rode NTG-3 --- [ Ссылка ]
Main Mic 2: Sennheiser MK8
Lav Mics: Sennheiser EW100
Audio Interface: RME Fireface UFX
Heads: Sennheiser Momentum 2.0 --- [ Ссылка ]
Heads: Sennheiser HD650
DAW: Ableton 9
Editing: Adobe Premiere Pro
Titles: Adobe After Effects
Thumbnail: Adobe Photoshop
Camera: Panasonic DVX-200
Vlog Camera: Sony FDR-AX53
Outdoor Camera: GoPro Hero 3
Recorder: Atomos Shogun Inferno


![FreeCAD меняем цвет граней, текстура граней модели [Texture, Color, Face]](https://s2.save4k.ru/pic/e8T0iEUjJj8/mqdefault.jpg)