What's the best way to tile a shower wall?
[ Ссылка ]
If you're doing a bathroom remodel and need help, enroll in Home Repair Tutor's online courses at [ Ссылка ]
Helpful product links:
T-lock leveling clips -- [ Ссылка ]
SeamClips (for leveling tile)
For 1/4"-3/8" thick tile(blue) [ Ссылка ]
For 3/8"- 1/2" thick tile (red) [ Ссылка ]
Horseshoe shims (for even grout joints)
For 1/16" grout joints - [ Ссылка ]
For 1/8" grout joints - [ Ссылка ]
Schluter Ditra (54 sft roll) -- [ Ссылка ]
KERDI-FIX Sealant -- [ Ссылка ]
KERDI-BAND (for seams) -- [ Ссылка ]
DITRA Trowel (to embed) -- [ Ссылка ]
12" grout float -- [ Ссылка ]
1/2" x 1/2" trowel -- [ Ссылка ]
1/4" x 1/4" trowel - [ Ссылка ]
linoleum knife (for scrape grout joints) -- [ Ссылка ]
ishii tile cutter -- [ Ссылка ]
Milwaukee Angle Grinder -- [ Ссылка ]
Dewalt Diamond Blade -- [ Ссылка ]
Bosch Hole Saw (1 3/8") -- [ Ссылка ]
Milwaukee sawzall/drill kit -- [ Ссылка ]
hydroban waterproofing -- [ Ссылка ]
redguard waterproofing -- [ Ссылка ]
epoxy grout -- [ Ссылка ]
quartzlock2 -- [ Ссылка ]
Flexcolor -- [ Ссылка ]
Today we share 9 Quick Tips for how to tile a shower wall.
For more tips and tricks visit Home Repair Tutor
Tip #1: Check shower stud walls
No stud wall is made the same. Place a 4 foot level vertically, horizontally and diagonally on studs to check their plumb and level. Off-kilter studs can be fixed by sistering a second stud to them.
Tip #2: Waterproofing Behind Tile
There are a variety of great waterproofing methods..use one, e.g. KERDI-BOARD, Wedi, GoGoard, Cement Board with RedGard, Cement Board with ARDEX 8+9, Cement Board with Hydroban.
For Wedi - [ Ссылка ]
Ardex 8+9 - [ Ссылка ]
Tip #3: Plan Tile Layout
All you need is the size of the tile, grout joint, measuring tape, and pencil & pad. Play the tile layout to avoid slivers at the ceiling and corners. There's nothing worse than a sliver of tile.
Tip #4: Get Quality Tile
Don't buy cheap clay based tiles...every chip will show. Get quality porcelain tiles that are the same color throughout. Check for imperfections and cupping.
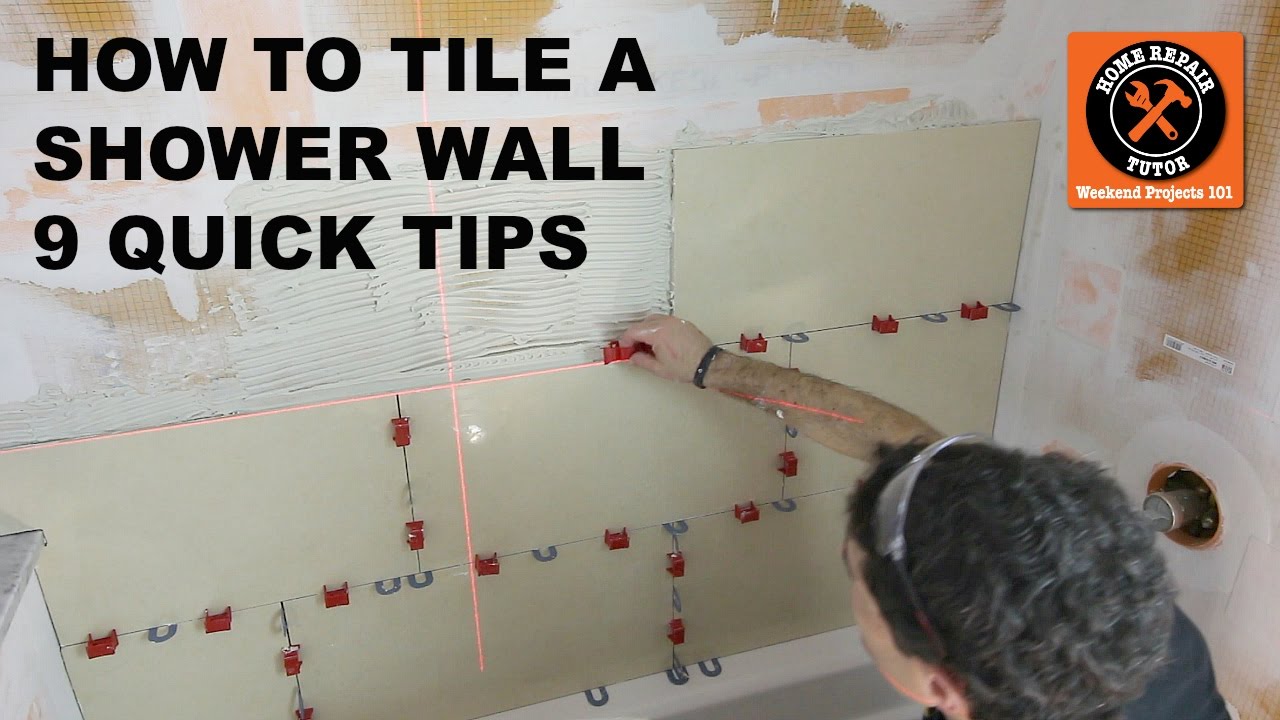
Tip #5: Tile Leveling System for Large Format Tiles
Listen, tile leveling systems aren't necessary all the time. But large format tiles often have irregularities. And leveling systems help set these tiles and eliminate tile lippage. They're worth considering.
Perfect level Master (recommended for large format tile - [ Ссылка ]
SeamClips (for leveling tile)
For 1/4"-3/8" thick tile(blue) [ Ссылка ]
For 3/8"- 1/2" thick tile (red) [ Ссылка ]
Tip #6: Stagger Large Format Tiles in Thirds
Large format tiles set in thirds helps stop lippage. Read the TCNA handbook for more tips on this.
Tip #7: Small Grout Joints
Grout joints that are 1/16" or 1/8" help cut down on maintenance. Plus, they just look better.
Horseshoe shims (for even grout joints)
For 1/16" grout joints - [ Ссылка ]
For 1/8" grout joints - [ Ссылка ]
Tip #8: Quality Thin-Set
Use something like ARDEX X77 for large tiles. Choose the correct trowel size, back butter and use directional troweling as well. There are a lot of great thin-sets but we always go back to X77.
Tip #9: Quality Grout
Keracolor U, Mapei FA, ARDEX WA, SPECTRALOCK, QuartzLock 2, Flexcolor CG...these are all good options.
Hope these tips help your tile your shower wall.
To make tiling easier try Tuscan Seam Clips (leveling clips) :
For 1/4"-3/8" thick tile(blue) [ Ссылка ]
For 3/8"- 1/2" thick tile (red) [ Ссылка ]