Click here to get notified when I upload new videos! [ Ссылка ]
__E L S A L I N K S__
Facebook: [ Ссылка ]
Instagram: [ Ссылка ]
Snapchat: elsarhae
Twitter: [ Ссылка ] (DONT FORGET THE 12)
Other Channel: [ Ссылка ]
Website/Blog: [ Ссылка ]
__V I D E O L I N K S__
Pipes Wall Paint: [ Ссылка ]
Paint Stroke Tutorial: [ Ссылка ]
Clock Butterfly Digital Art Tutorial: [ Ссылка ]
__M U S I C__
CGI-Snake: Youtube Audio Database
__F I L M I N G E Q U I P M E N T__
-Nikon D600
-Nikon 24-85mm Lens
-Diva Ring Light
-Softbox Light Kit
-Sennheiser MKE 600 mic
-Zoom h4n audio recorder
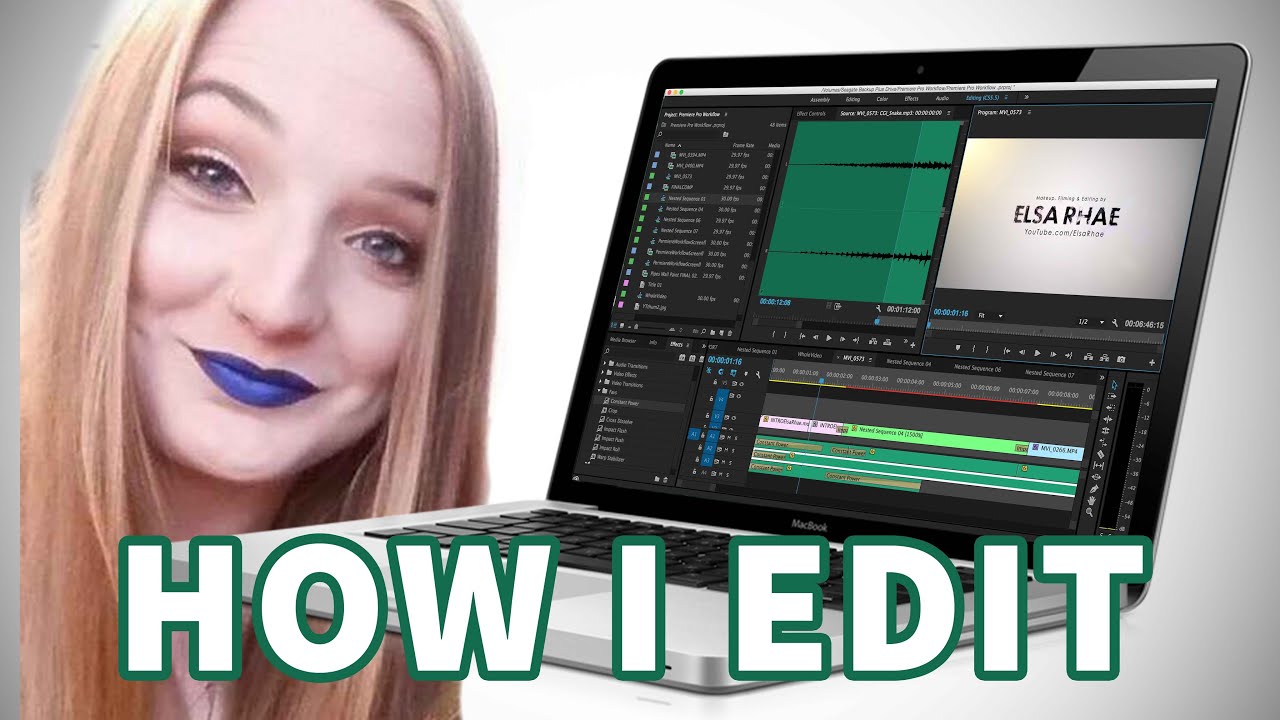
-Macbook Pro 2014
-Adobe Premiere Pro
I have all my project files in my project folder including any jpegs or audio files.
I start by opening premiere and creating a new project.
This video I was working on was of my latest Wall paint video—check it out!
I save the project with all my files in the project folder and I then hit SCRATCH DISK. I like to save my scratch disks in the same as my project so I make sure all these settings are set to “same as project” and I hit OKAY and the project opens.
My favorite preset is editing CS5.5.
So now lets import our footage. Open MEDIA BROWSER and locate our files from there. Navigate to the project folder and open your files, command A to select them all, right click and hit import.
I have two cameras for this video so I then take all those clips and drag and drop them onto the FOLDER button to create a separate bin for the first camera. Then I do the same process for the second camera!
NOW I’m importing my audio file.
The next step is to create a timeline to edit on. One way to create a timeline is to go to the “NEW ITEM” button and select sequence. You’ll then be given a huge list of settings to create the exact kind of sequence you want.
I hit I for the in point and O for the outpoint. You could also use these in and out brackets but that takes a lot of time.
You can click and drag from the source monitor into the timeline and you’ll get the camera audio and the video clip together. If you are only wanting video the video clip, click the film strip button and drag it into your timeline. Similarly if you want only audio, click the waveform button and drag it to the timeline.
Make a selection and instead of dragging and dropping I hit “,”. Now the video clip goes right after wherever the playhead was located in the timeline.
Here’s a better example: Lets say I have some clips already in place. My playhead is right here in the middle of a clip and when I hit comma, my selected clip will go right where the playhead was, but instead of overlap the clips in the timeline it moves everything back. To make things really easy for yourself, hit the down arrow on your keyboard and it will jump the playhead to the end of each clip. Then you can go from there!
I almost never use camera audio. I double click the audio file to bring it into the source monitor and zoom in by using the + button on my keyboard. I do the same in and out process as before and THIS time instead of hit “,” I hit “.”. Here’s what “.” does.
What happens when I hit “.” is the clip is inserted at the playhead just like when you hit comma, but now it is OVERLAPPING the clip you inserted. The clips behind it aren’t moving, you’ve just going overtop of what was already there.
This is the timeline with the audio and video files put together where I want them. I like to sort different types of clips like titles vs jpegs vs video clips in my timeline by separating them onto different tracks.
If you want to make your own bin, right click and hit create custom bin. You can then drag and drop any video or audio effect in you want!
I add transitions anywhere I feel necessary including after the intro and whenever I introduce a photo or a new type of “scene” in my videos.
After transitions I like to color correct.
Then I go up to File-EXPORT-MEDIA and it brings me into an export settings box.
For YouTube I always export in the H.264 format with HD 1080p 29.97 setting


![Они меня преследуют! | MEOW - 4 серия [4K]](https://i.ytimg.com/vi/U_PeNutGOH8/mqdefault.jpg)


![*•Страшные истории на ночь•* Gacha club/life/nox |30 часть| [час] + сюрприз](https://i.ytimg.com/vi/aCsJeH_di4k/mqdefault.jpg)


![Заключительная серия | MEOW - 20 серия [4K]](https://i.ytimg.com/vi/YiSdxLAOmbU/mqdefault.jpg)