Thank you for watching my How-To video on building a wheelchair ramp! Below you can find my quick guide to building your own ramp and saving money.
1. Measure. Take an accurate look at your space and determine how long you wish to make your ramp. Take into consideration the slope/grade of the ramp. If you wish to consult with the ADA guidelines on ramp length you can check it out here: [ Ссылка ] Also if you would like some assistance figuring out the angles and lengths of the ramp here is a great calculator: [ Ссылка ]
2. Cut your boards to length. With your dimensions you should now know the dimensions of the right angle and supportive bracing. With an angle guide and the angle calculator above you can cut miters into your angled boards so they line up.
3. Assemble your Right-Angles. First attach the right angle pieces. You can also add your horizontal spacing along the bottom of the ramp as well at this time.
4. Refine your angle. With the right-angle assembled, this can make it easier to visualize your ramp coming together. You can use this partial assembly to refine the angle needed for the slanted boards you will soon be attaching.
5. Remove old stairs (if you haven’t completed this step yet)
6. Slide the partial ramp in place. This will help you with your last minute calculations as you prepare to place the slanted 2x4s in their proper position
7. Continue Assembly. Continue placing your 2x4 bracing in place as you prepare your ramp to be sturdy enough to hold your plywood sheets on top.
8. Attach the plywood sheets. Drill pilot holes then screw in the sheets firmly to the 2x4s.
9. Cut Plywood to Length. Once attached you can remove the excess wood with a jigsaw or you can cut the before attaching by using a table saw.
10. Round-Over the plywood that is touching the floor.
11. Attach the Wheel Guard. I cut a piece of 2x4 to length and attached it using wood glue and clamps. Simple and effective.
12. Paint!!
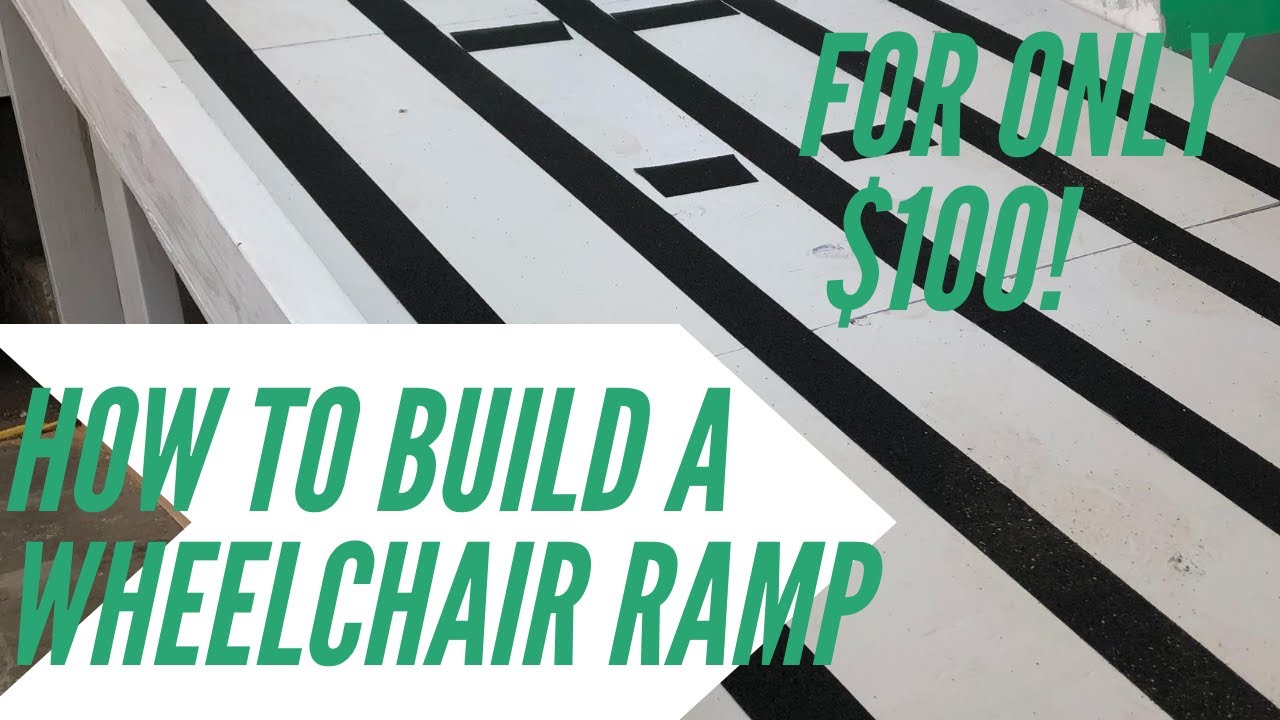
13. Add Grip Tape. This will add traction and make getting up and down the ramp a breeze!
----------
Tools & Supplies Used (Affiliate Links)
Skil Jigsaw: [ Ссылка ]
Hitachi Miter Saw: [ Ссылка ]
Hand Plane: [ Ссылка ]
Ryobi Drill: [ Ссылка ]
Ryobi Impact Driver: [ Ссылка ]
Titebond Glue: [ Ссылка ]
Pocket Hole Jig (Recommended): [ Ссылка ]
Coping Saw: [ Ссылка ]
----------
SUBSCRIBE to my Channel Here!
[ Ссылка ]
----------
FOLLOW ME on Social Media!
Instagram: [ Ссылка ]
Facebook: [ Ссылка ]
Shop: [ Ссылка ]
Music Attribution:
Song: Elektronomia - Summersong 2018 [NCS Release]
Music provided by NoCopyrightSounds
Free Download/Stream: [ Ссылка ]
Watch: [ Ссылка ]
Song: NIVIRO - Flashes [NCS Release]
Music provided by NoCopyrightSounds
Free Download/Stream: [ Ссылка ]
Watch: [ Ссылка ]


![СБОРНИК #2 [ Наруто система семьи ] \ Альтернативный сюжет наруто](https://s2.save4k.ru/pic/oiV_f_t4uKo/mqdefault.jpg)