Today, let’s talk about flooring because it’s the largest area in your dollhouse and
using the right materials will improve its overall look.
Welcome to miniLand.ca, the center for handcrafted miniatures.
In this tutorial we will make a floor template using wooden oak strips
which you will find here, exclusively at miniLand.
50 oak strips come in a bundle… 19 ½” long and 3/8th “ wide.
Let’s start this floor template by arranging the strips I already cut
into this three-pattern design. Let me show you how.
I mark the width of one wooden strip with the letter w.
Can you see that the length of these short strips are 3w or 3 times the width? Great!
So this makes the length of the long pieces 6w or 6 times the width.
Now let’s cut the strips.
Cut them to 3 times and 6 times the width (as we just explained) using a small device
called The Chopper.
The handle of The Chopper cuts with a standard razor blade.
Start here with the chopper handle down and place 6 small strips
on the cutting mat against the ruler running along the top and place them side by side.
These will be your measuring guide to cut your 6 times w strips.
Take one of your angle patterns that come with The Chopper to use as a stopper and
tighten it with the thumb screws to keep the wooden strips in place.
Now that you’ve marked this length for your long strip, take off these
small pieces and you will now cut the longer strips 6w.
In other words, every strip you cut now will be 6 times the width.
Cut enough pieces 6w long to cover your entire room.
Now let’s repeat this process to cut pieces that are 3w long.
Place three strips 3 times w on the cutting mat and again use
the stopper to keep them in place and tighten the thumb screw.
Use these to cut strips 3w or 3 times the width.
Cut enough to cover the whole floor.
We use gorilla glue to stick the wooden strips to the floor
because it dries very slowly and it gives you enough time to finish the floor.
Mark grid lines on the floor of your dollhouse to give you symmetry.
Pour glue around the floor and with a plastic card spread it out to make it even.
Use just enough so the strips will stick because you do not want the glue oozing
out between them and appear on the surface.
When the glue is even, using one long wooden strip as your guide,
lay it on one line and using our design start to place the pieces on the floor.
You can use a utility knife like I’m using to help you with this application for small scale precision.
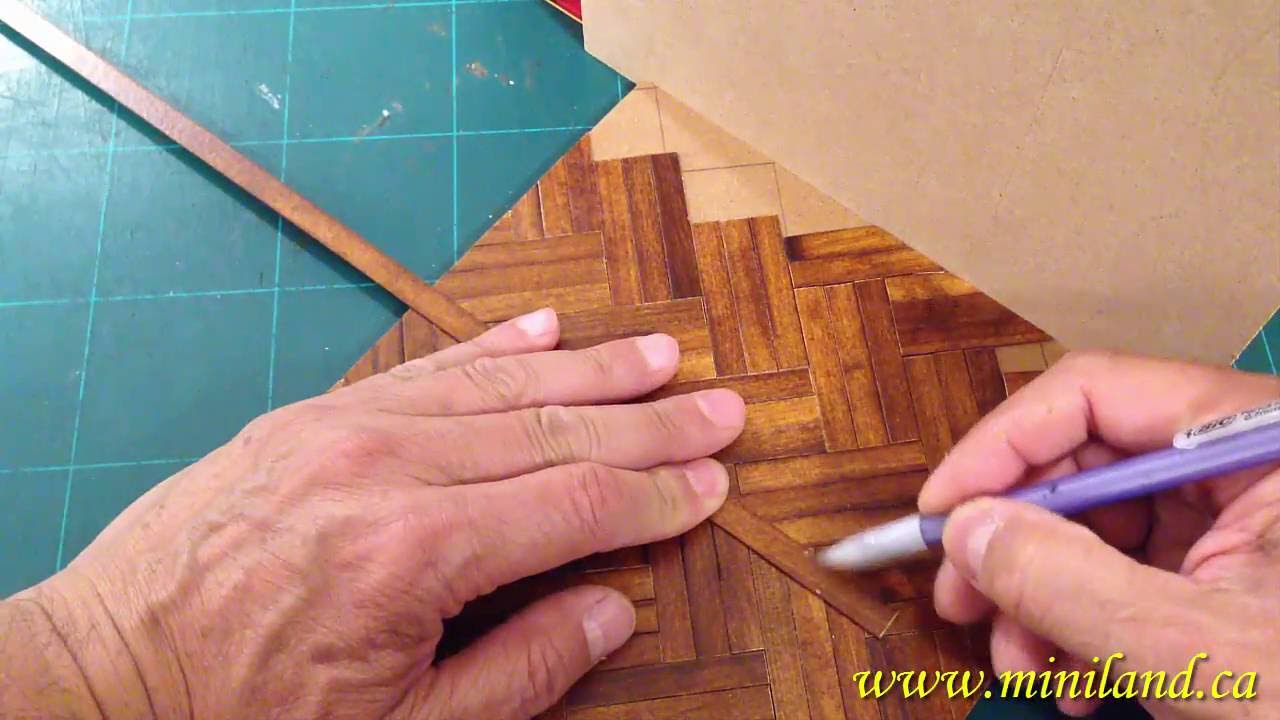
Now, watch how we cut the strips when we come to the edge.
I will use this yellow line for the demonstration.
Lay your strip down in the place you need to cover.
Using my red arrow as a guide, I use my utility knife to make a mark
on the strip at the inside corner where the two meet and where my red dot is.
And notice at the bottom, the yellow arrow tells you to move
your strip over on top of the one next to it, moving it down so the ends line-up.
So move the strip, make another mark at the corner inside like I show you.
With a pencil, draw a line between these two marks and look what happens.
When I rotate the strip and move it into place,
this 180 degree cut will fit exactly in the place you want to cover.
Now cut the strip and glue it down.
Now just repeat how you mark, rotate, cut and place the rest of the strips.
Make your marks, draw a line between them, cut between the lines,
place the strips on your floor and press them into the glue.
In our tutorial we use just one type of design but the designs you can create are unlimited.
I will give you some ideas.
This one is called the cubical or square basket design.
You need to cut your strips to 3w.
This design is called decking and the strips are cut to 6w.
This triple herring bone design is arranged in a pattern
of three with a 6w length cut.
And this double herring bone design is cut to 7w length.
Be creative in making your dollhouse floor the best it can be
with these oak strips found exclusively here at miniLand.ca.