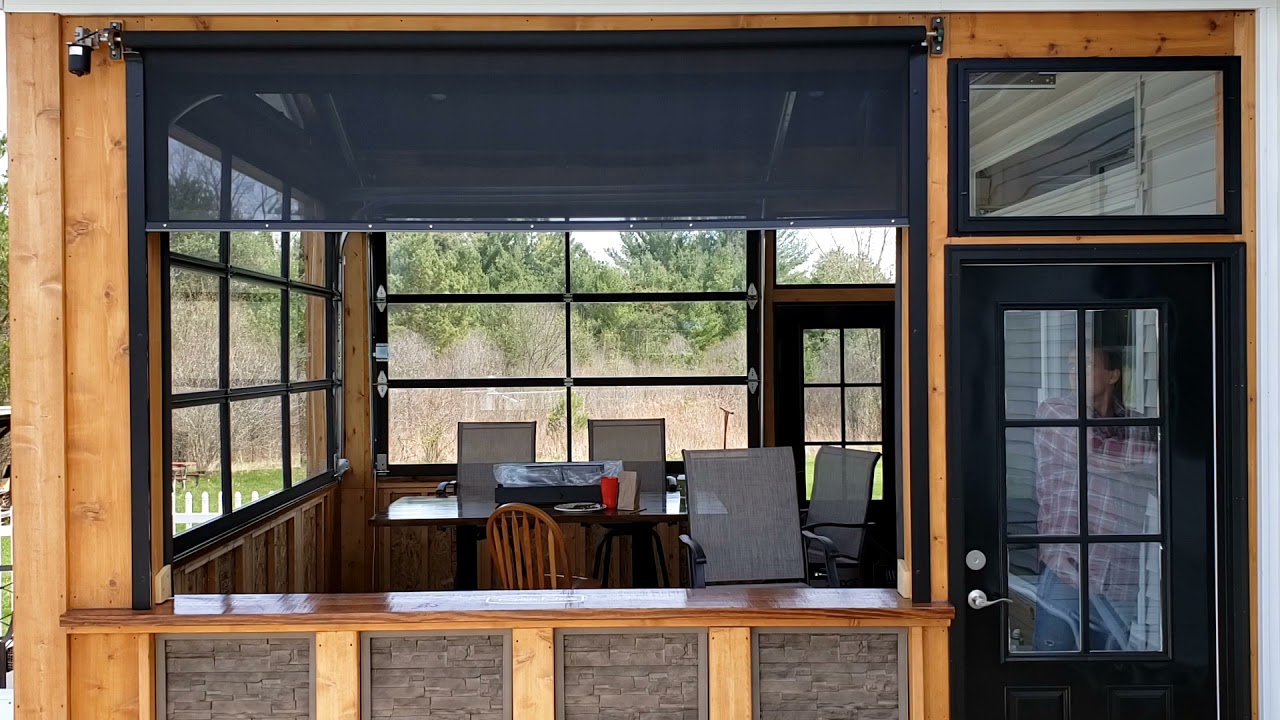
I wish I would've documented more on how I made this. I did 3 screens for about $300 each. Much better than the $1400 each for Larson and MUCH more from other brands. Only thing not shown in this video is the aluminum shroud that covers the system from the weather (I added it after the video was shot). The screen material in this video is an 80% sun shade screen.
Link to another video showing it during the build: [ Ссылка ]
I used a 12V power supply like this one: [ Ссылка ]
I used this motor: [ Ссылка ]
The motor has a 3/8" D shaped shaft. I used a 1/2" OD x 1/4" ID aluminum tube (from Orange Aluminum in California) to go over that shaft but I had my CNC friend open up the 1/4" ID to fit over the 3/8" shaft. He also drilled/tapped some set screws into the tube to hold it to the motor shaft where the flat spot of the "D" shape is located.
I used a 1.5" aluminum tube from Alro steel. Tube wall is 3/16" thick so the ID is 1.125". I had the same CNC shop friend make some 1.125" OD x 1/2" ID adapters to go between the 1/2" OD tube (the one I just mentioned) and inside of the 1.125" ID of the aluminum tubing. The 1.5" tubing was drilled/tapped with set screws to lock on to the adapter plate. The adapter plate was drilled/tapped with set screws to lock onto the outside of the 1/2" aluminum tubing. So basically, after all of that, you'll have a 1.5" tube with 1/2" tubes sticking out of both ends.
The 1/2" tubes at both ends of the 1.5" tubing are held up by these pillow blocks:
[ Ссылка ]
The 1/2" OD aluminum tubes fit perfectly inside the pillow block bearings. One of the 1/2" tubes sticks out further than the other so it can attach to the motor. So now the motor turns the tubing system and the pillow blocks hold it in place.
I ordered some screen rolls, cut it to the right size, and used double sided carpet tape from Lowes to attach it to the tube. [ Ссылка ]
I also used a PWM speed controller from Amazon to manually control the speed of the screen when it gets near the end of the cycle. [ Ссылка ]
Here's the switches I used: [ Ссылка ]
The only parts I had to order from Larson were the side channels that the screen slides up and down in. The Larson part number for brown is 01-12210-5-1-1536c. White is 01-12210-2-3-1536c. You can order here: [ Ссылка ] I ordered brown and painted them black since they do not come in black.
For the bottom frame piece, I ordered 1/2" Slim Line bulb seals and the seal and the 7/8" Slim Line retainers. On the other side of the screen (inside) I used a 3/4" x 1/4" steel flat stock. Drilled holes through the Slim Line retainer and flat stock, then threaded the holes in the flat stock, and sandwiched the screen between the retainer and flat stock and tightened it together with stainless hex bolts. I also put some two way tape on the retainer and flat stock where they contact the screen (for additional support). You can see the bolt heads in the video of the finished screen. The main purpose of this bottom piece is not only to seal against the floor (or bar top like I have on my short wall), but also to provide enough weight to pull the screen down and also help keep it in place when it's windy.
Slim Line seals: [ Ссылка ]
Slim Line retainers: [ Ссылка ]