Best & Fast Prototype ($2 for 10 PCBs): [ Ссылка ]
Thanks to JLCPCB for supporting this video.
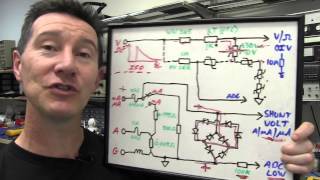
Learn how a PID controller for temperature works. We use a K type thermocouple and read real temperature values with the MAX6675 breakout board. SPI connected to the Arduino which will create the PID and control a MOSFET with PWM signal and the power for a DC heater.
my Q&A page: [ Ссылка ]
Help me on Patreon : [ Ссылка ]
Canal en Español: [ Ссылка ]
🔬PRINTERS FDM
-------------------------------------
Artillery Sidewinderr X1 (364€ Aliexpress): [ Ссылка ]
Artillery GENIUS (307€ Aliexpress): [ Ссылка ]
Creality3D Ender 3 Pro (230€ Aliexpress): [ Ссылка ]
Anycubic Mega S (206€ Aliexpress): [ Ссылка ]
ELEGOO NEPTUNE 2 (186€ Aliexpress): [ Ссылка ]
Prusa i3 MK3S Clone (393€ Aliexpress): [ Ссылка ]
Creality CR-10 V3 (480€ Aliexpress): [ Ссылка ]
🔅PRINTERS RESIN
-------------------------------------
ELEGOO Mars Pro (208€ Aliexpress): [ Ссылка ]
ELEGOO Saturn MSLA (480€ Aliexpress): [ Ссылка ]
Anycubic Photon Mono (199€ Aliexpress): [ Ссылка ]
Creality HALOT ONE (275€ Aliexpress): [ Ссылка ]
LINKS
________________________________________________________
Tutorial webpage: [ Ссылка ]
Part list: [ Ссылка ]
Schematic thermocouple: [ Ссылка ]
Final schematic: [ Ссылка ]
Code (thermocouple read example): [ Ссылка ]
Code (PID NO rotary encoder): [ Ссылка ]
Code (FINAL PID): [ Ссылка ]
Please, like, share and subscribe in order to motivate me for moe videos like this one. Thank you!