All content has been transcribed from original audio recordings. As a result, transcribed text may contain certain grammatical, spelling, or other language artifacts which don’t reflect the original audio recording. Please refer to the audio for the most accurate information and messaging. Any reproduction of the video content, audio, or transcribed text is strictly forbidden.
[ Ссылка ]
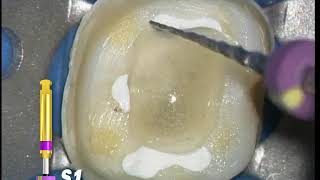
"Ruddle on Rotary" techniques allow you to safely and efficiently shape canals with emphasis on internal and external anatomy. Featured in this show is the step-by-step technique for utilizing the ProTaper rotary instrument series.
In this Just-In-Time segment, topics include:
Sequencing the preparation
Shaping with ProTaper
Floating-Following-Brushing
Maintaining the glide path
Creating deep shape
Finishing for success
*
when evaluating preoperative films in anticipation of internet treatment it's important to consider the films thoughtfully and carefully in this instance you can begin to plan in other words start with the end in mind and it would be wise in this case if we could remove the clinical crown which is a force in fused to metal restorative because that will shorten the tooth and oftentimes will allow us to work with shorter instruments which is an advantage the treatment sequence is pretty much what I've taught since the 70s but we want to secure the coronal 2/3 of the canal with 10 and 15 hand files if in fact there is a glide path we can shape this region with a couple instruments in this case the shaper one and the shaper two from the pro taper nickel titanium system with the upper 2/3 adequately pre enlarged and in the presence of a viscous key later we can Scout the rest of the canal once we have working length and a Paton canal it would be wise to ascertain if we could use rotary instruments or with the case be better served to use a manual set of instruments if in fact we have a glide path we would shape this region of the canal with the pro taper shaper 1 followed by the pro taper shaper 2 and we would at least go to the first finishing instrument the f1 which is a 2007 other cases may require larger finishers to more adequately prepare the apical 1/3 but this would represent the simplest way of using Pro Taper because in many posterior teeth it really is as simple as three instruments to get the final shape as we've talked about in other just-in-time shows the importance of sequencing the treatment provides many advantages so once we have a tentative working length I'm just not going to allow the rubber to reach the chosen reference point I'm going to allow the working length on the stop to be about three stops short of that selected reference point this means our instruments will be confined to the upper two-thirds clinically we like to work with assistance to benefit the economy of time and the viscous key later can be handed over where we can dispense it into the pulp chamber in the presence of a viscous key later we would begin to immediately secure the canal with first the ten followed by the 15 hand file we'd want to work about two thirds of the overall length of the canal the rubber stop would then be pushed down on the selected reference point the instrument is withdrawn and that length would be transferred to the first rotary shaping file we always secure canals in the presence of a viscous key later but we always shape canals in the presence of an aqueous solution such as sodium hypochloride the hero aspect of the pro taper shaping files is they're progressively increasing percentage tapers over the length of a single instrument these instruments are used optimally like a brush so we can brush into irregularities and eccentricities off the rounder part of canals by brushing and creating lateral space this allows the instrument to move progressively deeper into the canal after every rotary file irrigate recapitulate with the 10 file and reira gate to liberate that debris working with the assistant we can load up the shape or two and you can see how we just did that it's kind of a nifty little idea that you can get your assistants enrolled to float into the canal and before resistance begin to brush brushing away from Furcal danger brushing makes a lateral space and allows the bigger Eiffel Tower blades to progressively cut and engaged in more down into the middle one third of the route again once the rubber stop has reached the reference point our work is done and we have optimally pre enlarged the coronal 2/3 of the canal notice all the debris in the pulp chamber so the reminder is after every rotary irrigate recapitulate with a 10 file to make sure you always have the glide path and then break up debris move it into solution and then our irrigate to liberate that debris since we've never been in the apical third we want to put in a viscous key later and through a little bit of effort we will carry first to 10