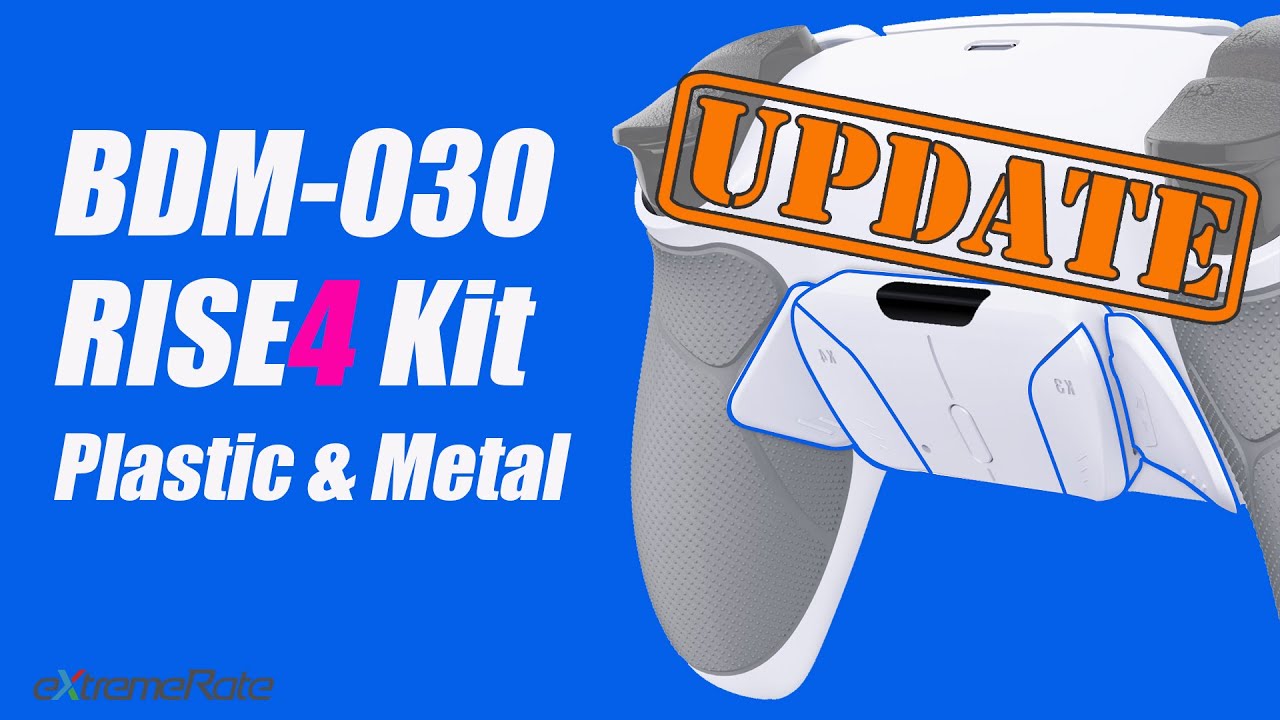
The main updated process is to place 4 plastic pads under the controller mainboard to make the board more stable.
NOTICE:
*The demo controller is the PS5 BDM-030 controller, similar to that of the structure of the BDM-040 controller.
*The tutorial includes the plastic and metal version of the RISE 4 Paddles Kit.
*Soldering is optional, if you don't need to remap the touchpad button, or the L3 & R4 buttons, please skip the soldering process.
Shop Links:
Plastic Version Shop Links:
Amazon US: [ Ссылка ]
Amazon CA: [ Ссылка ]
Amazon MX: [ Ссылка ]
Amazon DE: [ Ссылка ]
Amazon UK: [ Ссылка ]
Amazon FR: [ Ссылка ]
Amazon IT: [ Ссылка ]
Amazon ES: [ Ссылка ]
Amazon AU: [ Ссылка ]
Amazon JP: [ Ссылка ]
eXtremeRate: [ Ссылка ]
Aliexpress: [ Ссылка ]
eBay: [ Ссылка ]
Walmart: [ Ссылка ]
Metal Version Shop Links:
Amazon US: [ Ссылка ]
Amazon CA: [ Ссылка ]
Amazon MX: [ Ссылка ]
Amazon DE: [ Ссылка ]
Amazon UK: [ Ссылка ]
Amazon FR: [ Ссылка ]
Amazon IT: [ Ссылка ]
Amazon ES: [ Ссылка ]
Amazon AU: [ Ссылка ]
Amazon JP: [ Ссылка ]
eXtremeRate: [ Ссылка ]
Aliexpress: [ Ссылка ]
eBay: [ Ссылка ]
Walmart: [ Ссылка ]
Timestamps👇
00:00 Introduction to the 030/040 RISE Remap Kit
00:40 Disassembling the Controller
04:05 Optional Step—Touchpad Remapping Cable Soldering Tutorial
07:12 Optional Step—L3&R3 Remapping Cable Soldering Tutorial
09:18 Installing the Remapping FPC Cable to the Mainboard
11:27 Applying the PC Pads onto the Mainboard Corners
12:23 Installing the Battery and Remapping Cable
13:28 Assembling the Plastic Back Paddles & Back Shell
19:46 Assembling the Metal Back Paddles & Back Shell
30:05 Back Paddles Self-Check
31:10 Button Remapping Tutorial
32:52 How to Cancel a SINGE or All Remapping Assignment
33:25 FAQs


![Ninja Ryukenden | Ninja Gaiden прохождение 100% | Игра на (Dendy, Nes, Famicom, 8 bit) Cтрим [RUS]](https://s2.save4k.ru/pic/ffYRhZWIwls/mqdefault.jpg)