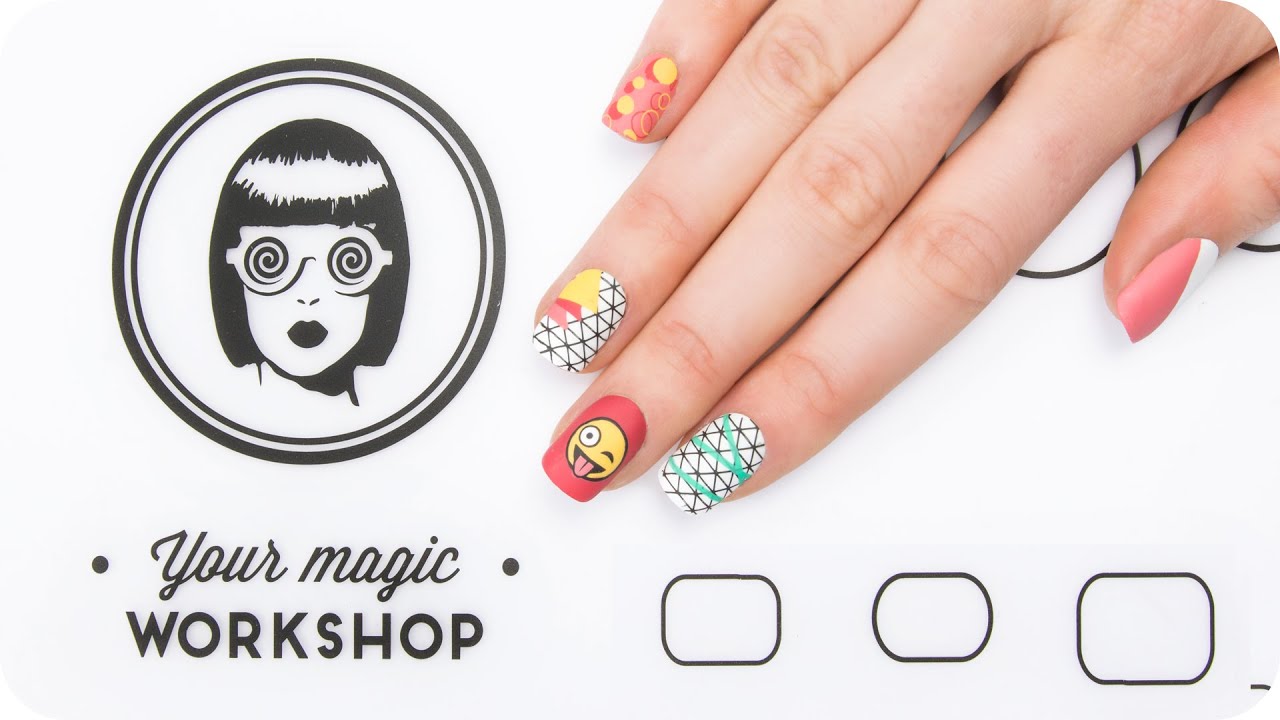
It’s finally here! Your Magic Workshop came to change the way you do nail art.
Made from a flexible and reusable material, this easy-to-clean board can withstand endless slicks of polish and protect your workplace.
Create decals with ease, reverse stamps and play with colour combinations!
Find all you need to get this Nail art here: [ Ссылка ]
In order to create this nail art design, you will need the following:
1. MoYou London Holy Shapes Plate #13 (or Holy Shapes Plate #06)
2. MoYou London Holy Shapes Plate #05
3. MoYou London Geek Plate # 09 (or Geek Plate #10)
4. MoYou London Holy Shapes Plate #09 (or Holy Shapes Plate #10)
5. Nail polishes we used:
-MoYou London Classick Lipstick
-MoYou London Teenage Blush
-MoYou London Bahamas Punch
-Moyou London White Knight 15ml
-Moyou London Black Knight 15ml
-Moyou London Cool Pool
6. MoYou London Rectangular Stamp & Scraper
7. Matte top coat and MoYou London Smudge Resistant Top Coat.
8. Tweezers
9. Scissors
How-to:
-Paint your nails as follows:
Pinky with Teenage Blush,
Annular, index and thumb nails with White Knight
Middle finger nail with Classic Lipstick.
-Using your Magic Workshop apply Classic Lipstick, Teenage Blush and Bahamas Punch separately over the nail shapes draw on the mat to create a decal of colour.
-Do the same, but this time with clear top coat.
While the nail polish dry, take Holy Shape Plate #13 and pick up the geometric mesh design and stamp it into your index finger.
Then, do the same with your annular finger nail.
When it’s dry, you can lift the decals of nail polish that you did previously and cut it into little triangles from the mat.
Applying a small amount of top coat, stick the little triangles into your annular finger nail, one after the other. When you are done, you can apply top coat to secure the decals.
Now, you can take Holy Shapes Plate # 05 and stamp the design with lines into your index finger nail using Cool Pool.
After that, with Geek Plate #09 select a smiley and stamp the design on top of the decals of top coat that you previously did, using Black Knight. You can do 3 of them, in case something goes wrong with one of them!
With a small brush, fill the face of the smiley with Bahamas Punch, White Knight for the eye and Teenage Blush for the tongue. You can always use the circles on the top of the mat to mix colours until you get the desired hue.
While the smileys decals are drying, take the Teenage Blush nail polish and fill diagonally half of your thumb nail.
Now it’s time for the pinky! Take Holy Shapes Plate #09 and with Teenage Blush fill the sickle design that you fancy the most and stamp it into your nail. Do the same with Bahamas Punch overlapping the designs.
You can put top coat to seal your nail except for your middle finger where the emoji will take its place.
By this time the decals should be dry. Using tweezers lift them from the mat.
If you want, cut the smiley around the face and then place it into your nail, press with your finger to stick it properly and them apply top coat.
You are ready to rock a mani that matches your new Magic Workshop! ;)
You can also follow us for more nail art updates on:
Instagram: [ Ссылка ]
Facebook: [ Ссылка ]
Twitter: [ Ссылка ]
♪ Original Song by: Melo-Zed - For Real Though ⇝ [ Ссылка ] ♪