[ Ссылка ]
[ Ссылка ]
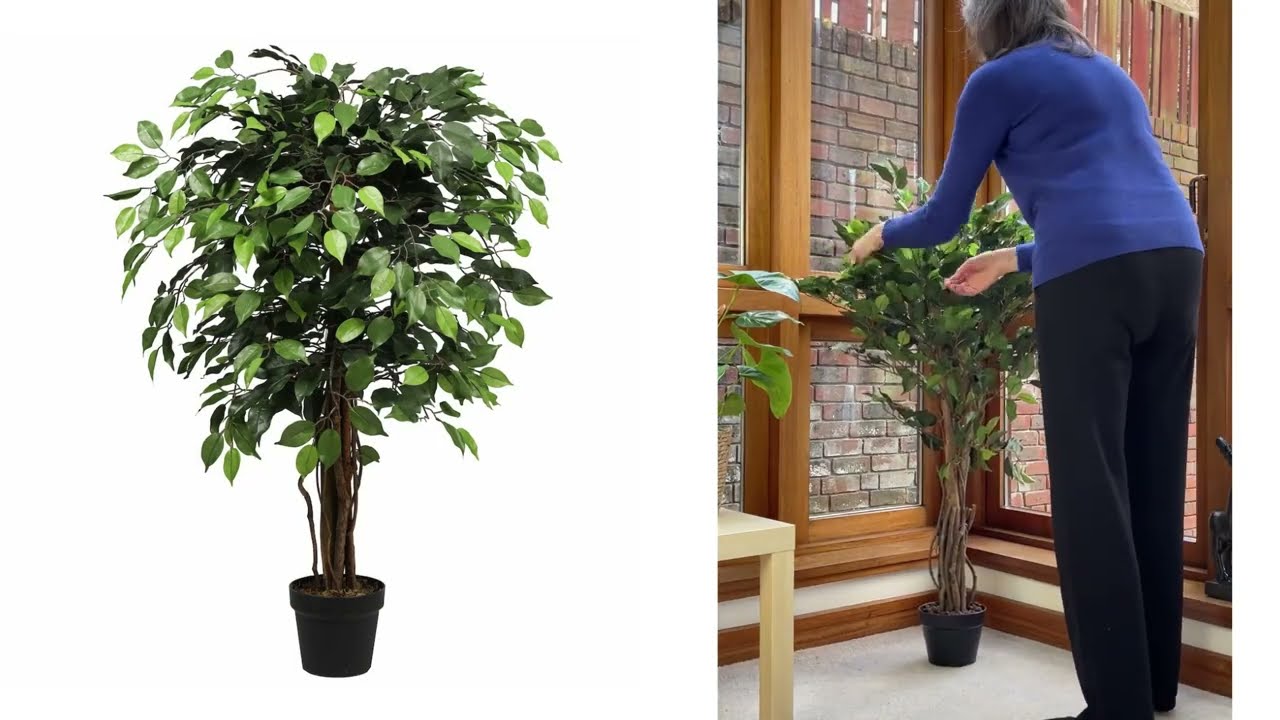
How to Shape Your Artificial Trees & Plants
The first introduction many of us have to artificial plants is our Christmas tree and, if you’ve ever shaped an artificial Christmas tree (more on that later), you have an insight into how to approach your year-round artificial decorative plants. Here’s an overview of what to expect.
Once you know what you are doing, shaping artificial trees and plants is easy and will ensure they look at their absolute best. Don’t confuse ‘easy’ for ‘quick’, though – in some cases this will require a bit of time to get the best results.
1. Unpack the plant
Most plants will arrive in an oblong box, which is great for transporting them but definitely not plant-shaped. Similar to your Christmas tree when it’s packed away, all the branches and leaves are smoothed out and laid flat, to save on the room needed for packing and also to protect the plant during transit.
Once you’ve got into the box – and if you’re cutting through tape with a knife or scissors, take care not to damage the plant inside – remove any packing material. Now take hold of the pot, which is the heaviest thing. If the plant is tall, you probably also need to take hold of the trunk or stem at about the halfway point, to help support it. Lift it out of the box and place it on a level surface. Depending on how tall your plant is, this will be either be a table or the floor, and the weighty pot will give it stability.
If the plant is wrapped in protective material, such as plastic, remove that now. If you ordered, for example, a six-foot tree, it’s unlikely to come in a six-foot box, so the top section will have been folded over. If that’s the case, straighten that out so the tree stands tall. If any of the branches have become twisted, straighten those out, too.
2. Start at the base
At this stage, your plant won’t look much like the one you ordered, but don’t worry – it soon will.
Whatever the type of plant, always start at the base and work your way up.
For a leafy plant, like a zebra plant, for example, start to pull the outer stems away from the main ‘trunk’. At this stage, the leaves of your plant are going to be flat. Natural leaves generally aren’t flat, they are curved. To shape large leaves, hold the tip in one hand and run the index finger of the other hand from tip to stem, curving and shaping as you go. Large leaves include wire, so will hold the shape.
Remember that the leaves at the bottom of a plant often have more of a curve than those at the top, so shape accordingly.
For a tree, pull branches away from the trunk, and ease the individual twigs and sprigs away from each branch. The branches of, for example, ficus trees are slightly curved, so shape them accordingly. When you’re happy with that, position the leaves, so they are spread out. Make sure your main trunk remains upright when you’re rearranging branches, otherwise it will look uneven.
You can be firm when shaping your plant, but don’t be too rough. It’s better to manipulate a leaf or a branch two or three times and gradually get the shape you want than try to get it done in one go and damage it.
If your plant has silk leaves or flowers that are creased, then playing a hairdryer on a cool setting over them will help the creases to drop out. Don’t blast full heat on the same area – that can cause damage – choose a low setting and keep the heat moving.
3. Check from all angles
When you’ve finished shaping your plant, rotate it or move round it to check it looks full and well-shaped from every angle. If anything needs tweaking, you can do that now.
Many thanks to @fightingfifty for the video demonstration.

![[KPOP IN PUBLIC ] BLACKPINK- ‘THE GIRLS’ | DANCE COVER | IrAi CDT](https://s2.save4k.ru/pic/d8KYFUD-dfM/mqdefault.jpg)


![[How to make] [pibby stuff] on ibisPaint X](https://s2.save4k.ru/pic/eFMsxLkbgpM/mqdefault.jpg)