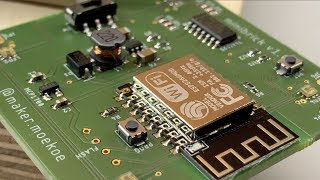
Simple soldering of a self designed PCB.
1. Fit the SMD soldering stencil to the PCB.
2. Dispense some solder paste to the stencil. Make sure that every pad is filled with solder paste.
3. Place all the components.
4. Solder it. (Here it is done with my self-build hotplate soldering iron, but it could be done with a reflow gun as well)
The minibrick will be sewed together with five or six of these pcbs, but only one of them will be equipped with the controller, the boost converter, the level shifter and all capacitors, resistors and of course the leds. The other four or five pcbs will be equipped with the leds only.
For more informations to the minibrick, the soldering hot plate or other projects you can follow me on instagram:
[ Ссылка ]


![Tutoriel / Cours Complet PhP & MySQL [Chapitre 21/27] : Insérer des données dans une BDD via PhP](http://i.ytimg.com/vi/FYMu0u6iLcA/mqdefault.jpg)


![Tutoriel / Cours Complet PhP & MySQL - [Chapitre 26/27] : Les filtres PhP](http://i.ytimg.com/vi/lVfJs39UU4k/mqdefault.jpg)


![[STM32] №2 Software начало. Твоя первая IDE. Где взять и что ещё скачать?](http://i.ytimg.com/vi/VC1VXmF8-2w/mqdefault.jpg)


![Tutoriel / Cours Complet PhP & MySQL [Chapitre 21/27] : Insérer des données dans une BDD via PhP](https://i.ytimg.com/vi/FYMu0u6iLcA/mqdefault.jpg)

![Tutoriel / Cours Complet PhP & MySQL [Ch 20/27] : Connexion à MySQL et création de BDD](https://i.ytimg.com/vi/qceI3TQJlC4/mqdefault.jpg)