Check out my Basic Tutorial here for more info on the first steps: [ Ссылка ]
GitHub Repository: [ Ссылка ]
My itch.io page: [ Ссылка ]
Steps:
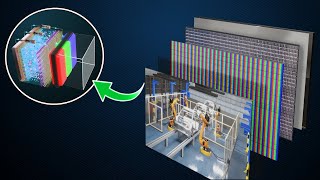
1. Create a second Camera which only renders the Layer which all pixelated objects are on.
2. Set its output to a low-resolution Render Texture.
3. Use a Raw-Image UI element (In Screen Space - Camera mode) to display the RT on the screen.
4. Duplicate the second Camera to create a third.
5. Set its output to another RT but this one has the Color Format "DEPTH_AUTO".
6. Create a Shader akin to my one (don't forget to take raw depth).
7. Assign a material using that shader to the Raw-Image element.
8. If anything goes wrong make sure that your camera dimensions are all the same and your camera is producing a depth texture (this can be enabled manually).
Movement scripts and animation from the Jammo and Kevin Iglesias' Basic Movement Free packages from the Unity Asset Store.
Made in Unity 2019.3.13f1
Pixel Art Shader In Unity | Intermediate Tutorial
Теги
unityunity hdrpunity shadersunity tutorialunity lwrpunity urpshader graphmade in unitypixelatedpixelationsunity tutorial for beginnersgithubshadergraphlow-respixel artpixel art easycreateno codegfxaseprite animationrender texturesunity srpmadalaskipixelation3d pixelartvoxelpixelart tutorialgamedevtutorialquicklow-polylow poly character20202019cinemachinecfast tutorialsbritishfunny579pixelart effectpixel effect