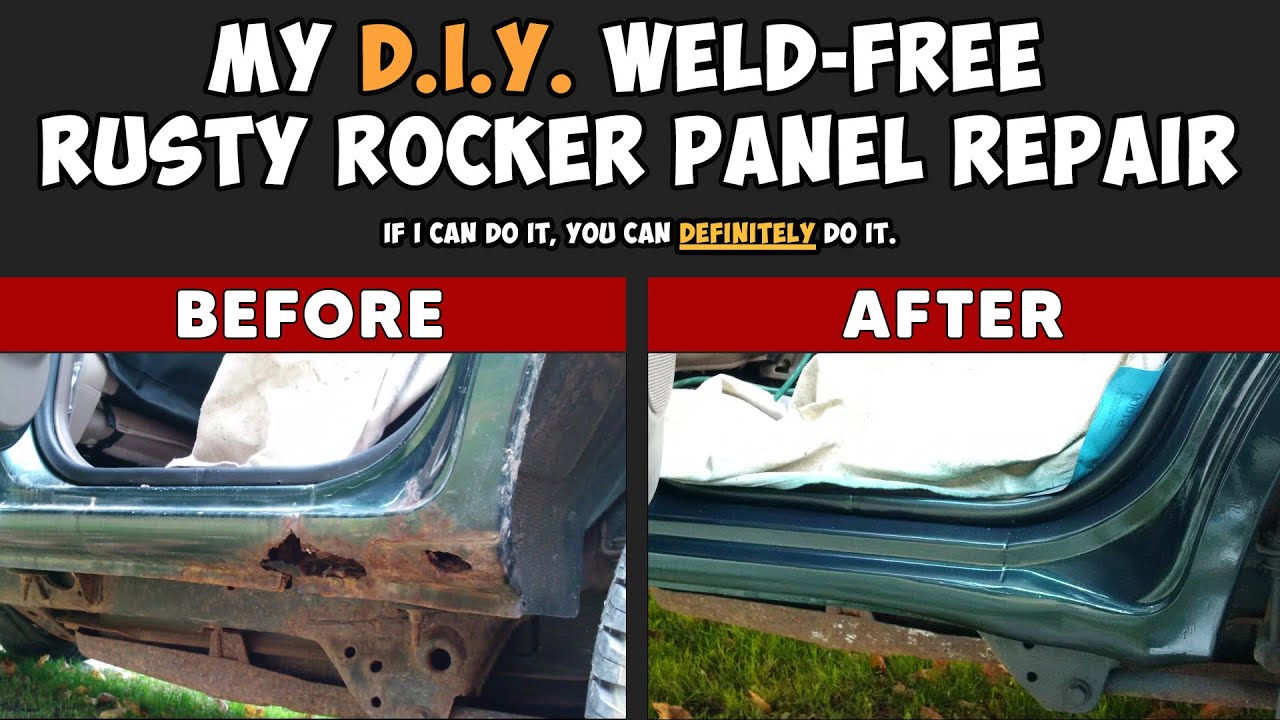
This wasn't easy, and the results aren't perfect, but the "After" is a thousand times better than the "Before."
00:29 Step 1: Rust Removal
01:33 Step 2: Rust Converter
01:57 Step 3: Rubberized Undercoating
02:30 Step 4: A lot of Bondo Glass, Bondo Mesh And Sanding
13:47 Step 5: More Sanding
15:06 Step 6: Gold Body Filler and Sanding Round 1
18:41 Step 7: Gold Body Filler and Sanding Round 2
20:12 Step 8: Glazing & Spot Putty and Sanding
22:02 Step 9: Gray Filler Primer
23:50 Step 10: Color Match Paint
25:17 Step 11: Clear Coat
Here are @chrisfix 's product links:
Products:
Glass Filler: [ Ссылка ]
Gold Filler: [ Ссылка ]
Adhesive Remover: [ Ссылка ]
Sandpaper: [ Ссылка ]
Spot Putty: [ Ссылка ]
Body Patch Mesh: [ Ссылка ]
Polish: [ Ссылка ]
Dust Mask: [ Ссылка ]
Sanding Block: [ Ссылка ]
Paint:
Rust Converter: [ Ссылка ]
Rubberized Undercoating: [ Ссылка ]
Filler Primer: [ Ссылка ]
Color Matching Paint: [ Ссылка ]
Duplicolor Clear Coat: [ Ссылка ]
Also here is the link to the respirator I HIGHLY RECOMMEND you get before getting into the sanding marathon that is rust repair.
Respirator: [ Ссылка ]
Respirator Filters: [ Ссылка ]
My DIY Weld Free Rocker Panel Rust Repair
Теги
Rust repairrust removalrocker panel rust repairbondorust repair without weldingrust hole repair3MChrisFix Rust Repairdo-it-yourself rust repairbefore and afterbefore & afterautobody repairhow to repair rust yourselfDIY rust repairbondo fillerno weld rust repairno welding rust repairrealistic resultsno weld rocker panel repairno weld rusty rocker panel repair3rd gen Toyota 4runnerdiy rust repairrust repair on carchrisfix rust


![BMW F82 M4 | Mountain Drifting [4k]](https://i.ytimg.com/vi/uK3-1GdfkIU/mqdefault.jpg)


![[OFF ROAD] - Patrol M57 420bhp | Toyota M57 | Jeep Grand Cherokee Zj 5.2V8 | #topoffroadromania](https://i.ytimg.com/vi/4ulvrUiQ0_k/mqdefault.jpg)