#Satafirm #S11 #Kingston #a400 #SSD #Fix #fixssd #as400 #fixing #ssdfix #kingstonssd
⛔️ CAUTION: READ THESE WARNINGS BEFORE STARTING ⛔️
⛔️ - THIS PROCEDURE WILL PERMANENTLY DELETE ALL PREVIOUSLY SAVED DATA ON THE KINGSTON A400 SSD.
⛔️ - THIS PROCEDURE HAS WORKED WITH ME BUT NOT NECESSARILY IT CAN WORK WITH YOU. I DO NOT TAKE ANY LIABILITY. PROCEED AT YOUR RISK AND DANGER.
⛔️ - Read always all the comments under the video: some user may have had your own problem during the procedure, and have received advice to solve it 👍
⬇️ ⬇️ ⬇️ ⬇️
🔌The Kingston A400 SSD is connected to the motherboard with sata cable (NO USB !) and powered.
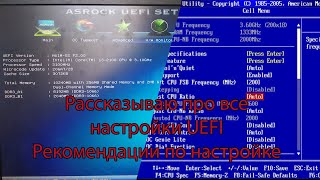
⛔️👉 Make sure you have AHCI mode ALREADY activated in the BIOS: 👈⛔️
let's start!
1 - I searched, downloaded and unzip from the web "phison_fw_convert"
( [ Ссылка ] )
2 - I searched, downloaded and unzip from the web, the Kingston firmware "SBFKB_fw_SBFKB1C3.bin"
( [ Ссылка ] )
3 - I copied the "SBFKB_fw_SBFKB1C3.bin" file to the [phison_fw_convert] folder
4 - I renamed the bin file "SBFKB_fw_SBFKB1C3" to "fw"
5 - Inside the [phison_fw_convert] folder I started by clicking, the command script file "s11-flasher2-micron"
6 - A file "fw.exe" has been created inside the folder [phison_fw_convert]
7 - Starting "fw.exe" starts a program "s11 firmware flasher v2.0" which updates the firmware of the Kingston A400 SSD
7b - ⚠️ If it stops abnormally 85% ('' ISP Jump .. '): Remove the power cord from the disc, and reconnect it and look at the result, sometimes comes to life, sometimes not... ⚠️
8 - ⛔️ It is NECESSARY to restart the PC to complete the operation.⛔️
(I turned it off and after 15 seconds I turned it back on)
9 - After reboot the SSD shouldn't be visible but the Kingston A400 SSD should appear in Windows "Disk Management".
(right click on Windows10's "Start" and choose "Disk Management" from the menu)
10 - In "Disk Management", right click on SSD and format the newly recovered Kingston A400 SSD in MBR.
11 - Still in "Disk Management", right click on the recovered Kingston A400 SSD and choose "Create Volume" an automatic guide for creating a volume will start. Complete the automatic procedure. Close "Disk Management".
12 - Now in "This PC" you should see the newly recovered Kingston A400 SSD in Windows 10 working again.
✨ Enjoy ✨
For those who want to deepen further, I add the resources from which I found the solution below.
⛔️⬇️ Remember, at your own risk! : ⬇️⛔️
🛠 - [ Ссылка ]
🛠 - [ Ссылка ]
🛠 - [ Ссылка ]
🛠 - [ Ссылка ]
🛠 - [ Ссылка ]


![[ AI ART 4K ] Nightie (See Trough) | Nightgown LOOKBOOK (Model Kim)](http://i.ytimg.com/vi/HNFrEUmBdKo/mqdefault.jpg)