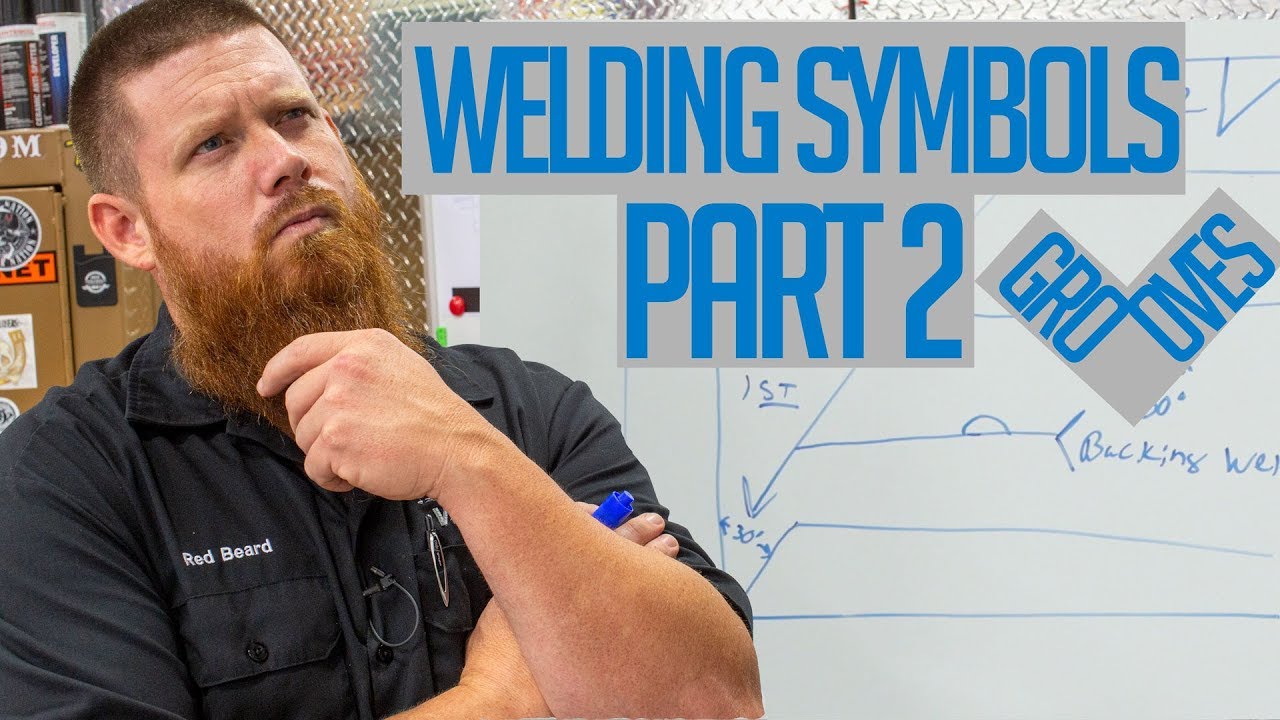
Employers look for specific skills in potential candidates. One of the main is "being able to read welding symbols". Download FREE Symbol PDF! ➡️ [ Ссылка ] .
Jason developed a lecture that would teach students how to interpret welding symbols. The AWS has 2 documents that he highly recommend purchasing for your library. The first one is AWS A2.4 Standard, Brazing, and Nondestructive Examination. The next one is AWS A3.0 Standard Terms and Definitions.
Ready to join the WELDing community? Download the app in the Google or Apple stores or Log in online at www.weld.com today! Find welding resources and exclusive or refurbished videos with details to help you get the most out of your learning. Check out awesome member discounts through our brand partners and enter to win monthly mystery boxes, listen in on our podcasts and follow our social channels. [ Ссылка ]
Disclaimer: As an Affiliate and Industry Influencer, Weld.com earns from qualifying purchases via our posted links and affiliate links. Videos produced and made available by Weld.com or any of its affiliates, subsidiaries, or representatives (collectively, "Weld.com") are provided for informational purposes only. Although every effort has been made to provide the most accurate and useful information from sources believed to be reliable, no warranty, expressed or implied, is made regarding accuracy, adequacy, completeness, legality, reliability, or usefulness of any information. As tools, products, materials, equipment, techniques, and applicable laws, regulations and ordinances are constantly changing, Weld.com cannot and does not assume any responsibility or liability for the accuracy of the information contained herein. Under no circumstances shall Weld.com be responsible or liable in any way for any content, including but not limited to death, injury, errors or omissions in the content, or for any loss or damage of any kind incurred as a result of any content communicated in a video, on a website or by other means, whether displayed by Weld.com, or a third party in its original or a modified form. All content is subject to Weld.com and any third party's applicable terms and policies. Carefully review all terms and policies.
ALWAYS USE CAUTION WHEN UTILIZING ANY DISPLAYED TOOLS, EQUIPMENT, TECHNIQUES OR PROCESSES. IF EVER IN DOUBT, CONSULT A LICENSED PROFESSIONAL. ANY RELIANCE ON THE PRESENTED INFORMATION IS STRICTLY AT THE VIEWERS OWN RISK. EACH VIEWER EXPRESSLY AND VOLUNTARILY ASSUMES ANY AND ALL RISKS INCLUDING, BUT NOT LIMITED TO, DEATH, DISABILITY, AND/OR SERIOUS PHYSICAL INJURY RELATED TO THE USAGE OF ANY TOOLS, EQUIPMENT OR TECHNIQUES OR PROCESSES IN THE PRESENTED CONTENT. IN THE EVENT OF AN INJURY IMMEDIATELY SEEK MEDICAL ATTENTION.
How to Read Welding Symbols: Part 2 of 3
Теги
welding symbolsweldingweld.commig mondaytig timehow to weldlearn how to weldwelding symbolweld symbolshow to read a weld symbolhow to read a blueprintwelding inspectionfillet wwelding symbols in drawingwelding symbols explainedwelding symbols and blueprint readingwelding symbols part 2welding symbols on blueprintswelding symbols in drawing solidworkswelding symbols in drawing in hindiwelding symbols part 3welding symbols cswip


![КАКОЙ КРИПТОКОШЕЛЕК ВЫБРАТЬ В 2024? [Полный обзор, ХОЛОДНЫЕ И ГОРЯЧИЕ КОШЕЛЬКИ]](https://s2.save4k.ru/pic/0tpU8gOjYqQ/mqdefault.jpg)